
Friday, March 29, 2013
"Jumping off the Page" Photoshop project
For this assignment we had to make it look like something was jumping, reaching, or flying of the page.

Tuesday, March 19, 2013
"Kaleidoscope" Photoshop project
For this project we cropped, rotated and flipped our pictures to make a kaleidoscope effect. The first image is made from a picture I took, and the second one is made from some doodling with the brush tools in Photoshop.


Wednesday, March 13, 2013
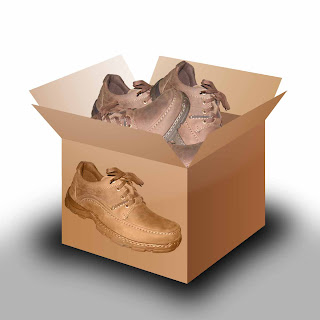
"Montage" Photoshop project
For this assignment, we made two picture. The first was just combining a lot of pictures we were given, and the second we got to choose what pictures we put together as long as we added certain effects.
1.

2.

1.

2.

Thursday, February 28, 2013

Friday, February 22, 2013
"Layer Images" Photoshop project
In this project we explored various different layer adjustments. The images below are pictures with a layer adjustment applied to them. Any colors that are off are due to my color blindness.
Brightness/Contrast:

This Adjustment allowed you to brighten or darken the picture, as well as change the contrast. I made this image a little bit brighter than it was.
Black and White:

This Adjustment changed the picture to black and white. I applied it to everywhere except the cat.
Hue/Saturation:

This adjustment allows you to change the colors in your picture via messing around with the hue and saturation.
Photo Filter:

This adjustment allowed you to change to color of the whole photo. In this case I added a blue filter.
Color Balance:

Using this adjustment, you can alter the colors in the picture in a variety of ways. I just messed around with the colors a bit. I'm not really sure how it turned out, because I am color blind.
Vibrancy/Saturation:

This adjustment can change the vibrancy of the colors in a photo, as well as how much color there is. I made the colors in the photo above much brighter so they stand out more.
Invert:

This adjustment will reverse all the colors in your picture. I have applied it to everywhere except on my dogs.
Choice:

For this picture I used several of the above adjustments. The background I made more vibrant, and I changed the color of my cat a bit.
Brightness/Contrast:

This Adjustment allowed you to brighten or darken the picture, as well as change the contrast. I made this image a little bit brighter than it was.
Black and White:

Hue/Saturation:

This adjustment allows you to change the colors in your picture via messing around with the hue and saturation.
Photo Filter:

This adjustment allowed you to change to color of the whole photo. In this case I added a blue filter.
Color Balance:

Using this adjustment, you can alter the colors in the picture in a variety of ways. I just messed around with the colors a bit. I'm not really sure how it turned out, because I am color blind.
Vibrancy/Saturation:

This adjustment can change the vibrancy of the colors in a photo, as well as how much color there is. I made the colors in the photo above much brighter so they stand out more.
Invert:

This adjustment will reverse all the colors in your picture. I have applied it to everywhere except on my dogs.
Choice:

For this picture I used several of the above adjustments. The background I made more vibrant, and I changed the color of my cat a bit.
Friday, February 15, 2013
"Visual Puns" Photoshop project
The goal of this project was to create images that display a pun. The images below are a play on words with various phrases.


Wednesday, February 13, 2013
"Celebrity" Photoshop project
In this assignment we chose a celebrity and changed both their eye and hair color.
 If I messed anything up, I blame my colorblindness.

Subscribe to:
Posts (Atom)